Been lurking here for awhile and decided to man up and share my first DIY project after about 10 years of looking at it sit empty. I posted this on a few other forums, but decided its time I contribute here. I assure you by "contribute" i DO NOT mean give you something useful you could possibly use in the future, but instead I mean give you a target for ridicule and hate mail. moving on...
About 10 years ago I bought a huge chandelier from goodwill for $50. I saw the future when I looked at this ugly hunk of crap..and the future said "hanging terrarium".

I yanked all the lights out. It had 2 fixtures - each with 6 lights. DAMN was it ugly. I threw all that right in the trash.
The chandelier had a door (for ease of changing light bulbs i guess) that was only one of the glass panes that swung outward. That was too small and not gonna work, so I enlarged that door by making the piece of glass next to it swing outward. Door on the right is original. Door on left, not so much.

I put some small hinges on it and tried my hand at soldering for the first time...it was...and is...laughably embarrassing:

Sorry for the blurriness, but you can clearly see that soldering is best left to anyone else. All the shiny silver around the hinge is 45 minutes worth of attempted soldering. It looks awful, but it's holding a hinge. Good enough.
There was no bottom, so I put a piece of circular glass in the bottom and siliconed it into place.
Someone told me that the metal seams holding the glass together could possibly leech toxins into the water that would effect animals. He admitted he had no idea if this was the case, but the thought scared me. I knew it would be humid in this thing and the condensation running down over toxic metal was a no go, so I siliconed every metal seam in the whole thing. Top to bottom. You can clearly see the silicone over the back seams here:

Let me explain this process to you: THE SUCKNESS.
There was no way to silicone all the seams, or even the piece of glass into the bottom without putting my entire head into the viv through the small door. I just couldn't reach all the parts I needed to without having my shoulder and whole arm in the viv, which also required my head to be in there. (Being attached to my shoulder... for the most part...)
Being in a 3 foot sealed enclosure while doing this is flat out retarded...but the show must go on and my brain cells had to take one for the team.
The fumes were outrageous. I mean OUTRAGEOUS. i nearly passed out several times.
I dont need the whole thing to be water proof, but just water resistant. Just keep any toxins (though I dont believe the metal will leech anything bad) where they belong. I had the idea of a false bottom for this pig, so the bottom is the only part that I attempted to make water proof. I apologize for these next pics..there is no excuse:


Listen, before you judge me, and my silicone extravaganza, understand that not only was I delirious from fumes, but also that I knew I had to make the bottom water proof. I would just razor blade the edges off later. I couldn't keep my head in this death trap any longer, so I rushed through the job gobbing silicone everywhere I could. The razor blade would make it pretty later, right?
Wrong.
After this pig cured and no longer smelled like a vinegar factory on a planet made of vinegar in a solar system that produced pure vinegar, I started blading the seams on the top. I gobbed everything on so thick, that blading left a HUGE ridge. On the top portion, that's not totally horrible, since that doesn't need to be waterproof... But on the bottom of the viv, a ridge could mean water could seep under the silicone and leak. It's doubtful, but still.
I finished blading the top portion and filled the pig with water upto the the top of the bottom pieces of glass. About 6 inches worth. I let it stand for nearly a week, with no leaks. I know i know. How could anything leak through that mess anyway. but still, it felt like a victory.
But there's no way i could hang that silicone job in my house. I'd have to cover the bottom portion with paper or something and that's not acceptable. I could just forget the idea of a false bottom and fill it with substrate. Great, but then I'd still see the silicone job..over dirt no less. No go.
So I figured either I a) blade the bottom portion all pretty like and test for leaks and hope none arise later or b) dissolve the silicone (all of it) with some sort of chemical and silicone it again, with tape and other ways to make it professionally pretty and presentable.
Since I went so much thicker on the bottom portion, the ridges that would be left from blading could be monstrous, so i just figured I'd dissolve it and do it again.
That was 10 years ago.
Help me guys, how do i make this pig presentable?
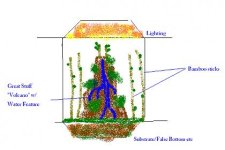
My idea is to put a nice stump in the center (with a waterfall) and make it sorta like a 360 degree hanging terrarium.
However other things are hindering the progress of this build, other than the silicone mess from hell.
How can I light this enclosure? It's completely sealed except for the door, and some small vent holes in the top. (See pic below)

Obviously the glass will block all the beneficial rays of a grow light, so I'd have to put he light inside the viv which raises several further issues, including but not limited to:
1)moisture concern. how will the lights handle so much humidity?
2)heat. having lights in a fully enclosed viv will heat this puppy up like a casserole at Rosie O'Donnell's house.
3)wiring. How in the world could I even get the wiring for the electrical into the viv? I guess cut the power cord for the lights and run them through the vent holes and resplice the electric prong? one problem: I know NOTHING about any of that...
4)Animal safety: What about an animal getting up close to the bulb and burning themselves?
I know if i used one of them CF spiral lights they run cool and probably wouldn't effect the viv much, (other than the provided light). leaving only the problem of wiring. again, I guess I could read a book on lectricle wirin'.
Of course I'd have to cut and splice the connections for a pump, mister system, fans etc etc... that would fill up 5 or 6 vent holes...there goes my vent holes...
One sure fire way to deal with this is to blade the silicone off, fill it w/ just substrate and put a hardy lizard in there, like anoles and some geckos. Run one light into it, no waterfall, no false bottom, no PDFs, nothing but a small water dish and some tough ass herps...
But i really wanted a 360 degree, hanging PDF vivarium. The bottom of the viv would hang about stomach level..how awesome would that be? So many obstacles..so little money.
(follow the link below to be able to access the full size pics if their too small)
Hanging Terrarium - Album - TinyPic
About 10 years ago I bought a huge chandelier from goodwill for $50. I saw the future when I looked at this ugly hunk of crap..and the future said "hanging terrarium".
I yanked all the lights out. It had 2 fixtures - each with 6 lights. DAMN was it ugly. I threw all that right in the trash.
The chandelier had a door (for ease of changing light bulbs i guess) that was only one of the glass panes that swung outward. That was too small and not gonna work, so I enlarged that door by making the piece of glass next to it swing outward. Door on the right is original. Door on left, not so much.
I put some small hinges on it and tried my hand at soldering for the first time...it was...and is...laughably embarrassing:
Sorry for the blurriness, but you can clearly see that soldering is best left to anyone else. All the shiny silver around the hinge is 45 minutes worth of attempted soldering. It looks awful, but it's holding a hinge. Good enough.
There was no bottom, so I put a piece of circular glass in the bottom and siliconed it into place.
Someone told me that the metal seams holding the glass together could possibly leech toxins into the water that would effect animals. He admitted he had no idea if this was the case, but the thought scared me. I knew it would be humid in this thing and the condensation running down over toxic metal was a no go, so I siliconed every metal seam in the whole thing. Top to bottom. You can clearly see the silicone over the back seams here:
Let me explain this process to you: THE SUCKNESS.
There was no way to silicone all the seams, or even the piece of glass into the bottom without putting my entire head into the viv through the small door. I just couldn't reach all the parts I needed to without having my shoulder and whole arm in the viv, which also required my head to be in there. (Being attached to my shoulder... for the most part...)
Being in a 3 foot sealed enclosure while doing this is flat out retarded...but the show must go on and my brain cells had to take one for the team.
The fumes were outrageous. I mean OUTRAGEOUS. i nearly passed out several times.
I dont need the whole thing to be water proof, but just water resistant. Just keep any toxins (though I dont believe the metal will leech anything bad) where they belong. I had the idea of a false bottom for this pig, so the bottom is the only part that I attempted to make water proof. I apologize for these next pics..there is no excuse:
Listen, before you judge me, and my silicone extravaganza, understand that not only was I delirious from fumes, but also that I knew I had to make the bottom water proof. I would just razor blade the edges off later. I couldn't keep my head in this death trap any longer, so I rushed through the job gobbing silicone everywhere I could. The razor blade would make it pretty later, right?
Wrong.
After this pig cured and no longer smelled like a vinegar factory on a planet made of vinegar in a solar system that produced pure vinegar, I started blading the seams on the top. I gobbed everything on so thick, that blading left a HUGE ridge. On the top portion, that's not totally horrible, since that doesn't need to be waterproof... But on the bottom of the viv, a ridge could mean water could seep under the silicone and leak. It's doubtful, but still.
I finished blading the top portion and filled the pig with water upto the the top of the bottom pieces of glass. About 6 inches worth. I let it stand for nearly a week, with no leaks. I know i know. How could anything leak through that mess anyway. but still, it felt like a victory.
But there's no way i could hang that silicone job in my house. I'd have to cover the bottom portion with paper or something and that's not acceptable. I could just forget the idea of a false bottom and fill it with substrate. Great, but then I'd still see the silicone job..over dirt no less. No go.
So I figured either I a) blade the bottom portion all pretty like and test for leaks and hope none arise later or b) dissolve the silicone (all of it) with some sort of chemical and silicone it again, with tape and other ways to make it professionally pretty and presentable.
Since I went so much thicker on the bottom portion, the ridges that would be left from blading could be monstrous, so i just figured I'd dissolve it and do it again.
That was 10 years ago.
Help me guys, how do i make this pig presentable?
My idea is to put a nice stump in the center (with a waterfall) and make it sorta like a 360 degree hanging terrarium.
However other things are hindering the progress of this build, other than the silicone mess from hell.
How can I light this enclosure? It's completely sealed except for the door, and some small vent holes in the top. (See pic below)
Obviously the glass will block all the beneficial rays of a grow light, so I'd have to put he light inside the viv which raises several further issues, including but not limited to:
1)moisture concern. how will the lights handle so much humidity?
2)heat. having lights in a fully enclosed viv will heat this puppy up like a casserole at Rosie O'Donnell's house.
3)wiring. How in the world could I even get the wiring for the electrical into the viv? I guess cut the power cord for the lights and run them through the vent holes and resplice the electric prong? one problem: I know NOTHING about any of that...
4)Animal safety: What about an animal getting up close to the bulb and burning themselves?
I know if i used one of them CF spiral lights they run cool and probably wouldn't effect the viv much, (other than the provided light). leaving only the problem of wiring. again, I guess I could read a book on lectricle wirin'.
Of course I'd have to cut and splice the connections for a pump, mister system, fans etc etc... that would fill up 5 or 6 vent holes...there goes my vent holes...
One sure fire way to deal with this is to blade the silicone off, fill it w/ just substrate and put a hardy lizard in there, like anoles and some geckos. Run one light into it, no waterfall, no false bottom, no PDFs, nothing but a small water dish and some tough ass herps...
But i really wanted a 360 degree, hanging PDF vivarium. The bottom of the viv would hang about stomach level..how awesome would that be? So many obstacles..so little money.
(follow the link below to be able to access the full size pics if their too small)
Hanging Terrarium - Album - TinyPic
") and b.) perspective. This thing is a beast. I love it
and b.) perspective. This thing is a beast. I love it