
Yoshi'smom
New member
A DIY tutorial for a Leopard Gecko enclosure:
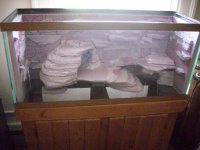
This project took approximately a month and a half. Total cost for this project was somewhere between $50 - $75. The new tank is a 30 gal long with stand and light fixture (we got it for free from a wonderful person).
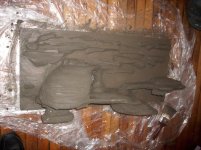
1. We bought 1 inch think pink foam insulation board and foam insulation glue as well as the grout we’d use later.
2. We came up with our design keeping in mind the cool hide and warm hide and added extra climbing surfaces.
3. We cut our pieces into the design desired using a stacking method. We also cut large surface pieces to mount our design onto that were the appropriate size to slide down into the tank. We left a bit of leeway on all sides to account for some extension when we grout it.
4. We then carved out some of the foam to give it a more natural rock look. Also we put in holes where our fake plants would go.
5. We then glued the three dimensional structures together and mounted them with the glue and nails for added support. We put some heavy books on top to hold the pieces together better.
6. We then mounted the 3-d structures onto their corresponding “walls” with the same glue and nails method.
7. We waited 2-3 days for all glue to dry and then fit it back into the tank to make sure it would fit.
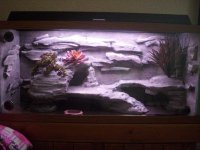
8. Then came time to grout. My first layer of grout was very thin. Just a cover. We did a layer of grout a day. The second layer was thick so that we could use the grout to help mold what we wanted the shape to look like. The next two layers were thin again.
9. We waited one full day before curing the grout. This is probably the most important step. You need to cure the grout to get rid of all the toxic materials in it.
10. To cure we misted the grout twice a day for 5-7 days.
11. We attached “bumpers” to the pieces as to not scratch the glass of our nice new tank. We cut lengths of fleece material and attached them to the ends and bottom with nails.
12. We got non toxic latex acrylic paint and painted to add more texture. We did a dark wash all over blotting as we went and then did several layers of dry brushing for the stony texture.
13. We let the paint dry for 2-3 days before setting it up in the new tank.
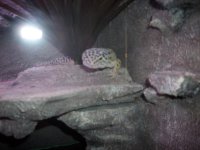
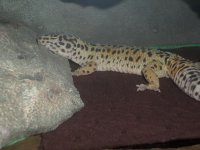
14. We put it in the new tank and let Yoshi have a ball!
This project was a ton of fun. As an artist it was wonderful to create something that my big guy will love! Pictures in the first reply.Thanks for reading!
This project took approximately a month and a half. Total cost for this project was somewhere between $50 - $75. The new tank is a 30 gal long with stand and light fixture (we got it for free from a wonderful person).
1. We bought 1 inch think pink foam insulation board and foam insulation glue as well as the grout we’d use later.
2. We came up with our design keeping in mind the cool hide and warm hide and added extra climbing surfaces.
3. We cut our pieces into the design desired using a stacking method. We also cut large surface pieces to mount our design onto that were the appropriate size to slide down into the tank. We left a bit of leeway on all sides to account for some extension when we grout it.
4. We then carved out some of the foam to give it a more natural rock look. Also we put in holes where our fake plants would go.
5. We then glued the three dimensional structures together and mounted them with the glue and nails for added support. We put some heavy books on top to hold the pieces together better.
6. We then mounted the 3-d structures onto their corresponding “walls” with the same glue and nails method.
7. We waited 2-3 days for all glue to dry and then fit it back into the tank to make sure it would fit.
8. Then came time to grout. My first layer of grout was very thin. Just a cover. We did a layer of grout a day. The second layer was thick so that we could use the grout to help mold what we wanted the shape to look like. The next two layers were thin again.
9. We waited one full day before curing the grout. This is probably the most important step. You need to cure the grout to get rid of all the toxic materials in it.
10. To cure we misted the grout twice a day for 5-7 days.
11. We attached “bumpers” to the pieces as to not scratch the glass of our nice new tank. We cut lengths of fleece material and attached them to the ends and bottom with nails.
12. We got non toxic latex acrylic paint and painted to add more texture. We did a dark wash all over blotting as we went and then did several layers of dry brushing for the stony texture.
13. We let the paint dry for 2-3 days before setting it up in the new tank.
14. We put it in the new tank and let Yoshi have a ball!
This project was a ton of fun. As an artist it was wonderful to create something that my big guy will love! Pictures in the first reply.Thanks for reading!
Last edited:
 )
)