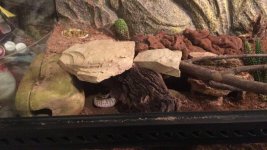
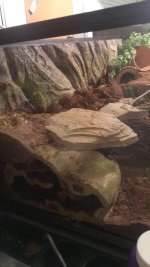
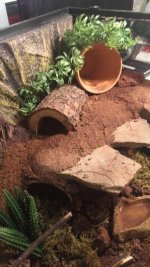
Leo vivarium!! (WIP)

yaoiphobic

New member
Fair warning: This might be a long one, so strap in :)

Ok! So first of all, I'm somewhat new to keeping leo's, so please keep that in mind when I ask stupid questions/don't know things lmao

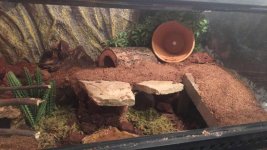
I've been working on a vivarium for my two adult female leo's and I'm at a point now where I'm happy enough with it to share some pics.

First of all, some details on the tank itself:

-The viv itself is an exo terra large low, I believe. I bought it from someone on facebook so I'm not completely sure. It's about 40 gallons, has a screen top, swing out doors, etc

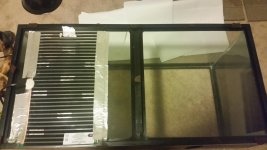
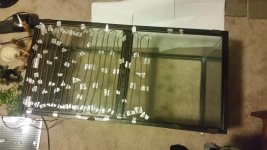
-I'm currently using a heating mat on the bottom of the viv and a heating lamp. The lamp is there only because I was unable to get it as warm as I need with the mat alone and comes off at night. (it's also the only light that the viv receives, as one of my leos is an albino morph and I'm worried about her eyesight. The light in my room was off in the pic but it's usually pretty dark since I'm away for work most of the day)

-I've got a thermostat and heat gun coming in the mail, for now I've been keeping an eye on the temps with a stick on thermometer until they arrive

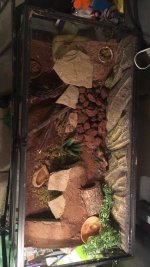
-The substrate is primarily a sand/excavator clay/eco earth mix (about 80% excavator clay, 10% non-calcium "desert" sand, and 10% eco earth) with a sort of "pool" that I carved out in the front that's filled with loose, dry eco earth. The "pool" is to allow for burrowing but so far they seem uninterested in it. I also have peat moss as a substrate in a few of the hides. There's also a part up at the top where it's basically a pit of lava rocks. I'm trying to vary my substrate a lot to give them as much enrichment as possible!

-There are 7 hides in total. Two are humid hides on the warm side, the rest are scattered around so that they have plenty of hides of varying temps to choose from. So far, the most popular have been the two moist hides and the big cool hide on the far right.

-The hides on the warm side have been carved out so that the floor is the glass bottom of the viv and allows for belly heat, with thin layers of eco earth, clay, and peat moss so that they're not in direct contact with the warm glass.


The inhabitants:
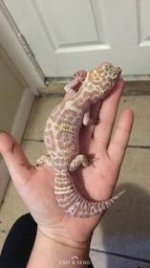
IMG_4368.jpg
Miso
IMG_4372.jpg
Taro!

(If anyone knows anything about what morphs these guys could be, let me know!)


I uploaded a short video tour of it on a throwaway tumblr here: https://shitposterextrordinaire.tumblr.com/post/163263377067/vid-tour-1

and here's a clip of the girls when I first put them in: https://shitposterextrordinaire.tumblr.com/post/163263391528/vid-tour-2


And finally: Pictures!
IMG_4419.jpg
The supply pile
-Two 10lb bags of zoo med's excavator clay
-One 2g jug of desert sand (came with the leos, no idea the brand, all i know is that its not calcium)
-one big bag of pre made eco earth (pre made bc it's less humid than making up a fresh batch)
-one pack of peat moss
-one HUGE bag of lava rocks (it was too cheap to pass up at $3, i barely used any)
-bucket full of big bricks (used to build a sort of skeleton that was then covered in the slay)
-various pvc piping for caves/tunnels
-bag of flat rocks
-a couple of pieces of wood from a local pet store
-a couple of pre made hides; one is a sort of rock thing that is split in half, where one half is on the inside of the viv and has a hole so that the geckos can get in, and the other goes on the outside and is attached with magnets that can be removed for viewing, one is a half log, ones a clay pot, and one is a plastic fake piece of rock
-one real tiny cactus (not prickly, dont worry) as a trial to see if it even grows and one fake one for decor
-and ofc, food and water dishes
IMG_4417.jpg
IMG_4443.jpg
When I finished the first part, and then later when I added rocks.

Side note: It's weirdly hard to get pictures of this build with that plastic part in the middle lmao

IMG_4453.jpgIMG_4448.JPGIMG_4446.jpg

When I get a chance I'll get side views of the hides on either side since you can see into them and some closeups. You can also see a few differences in the pictures as I added/removed stuff and these were taken over the course of a few days.

IMG_4418.jpgIMG_4441.jpg

Here's Taro exploring! Miso's a bit shy still, so she's harder to get pictures of.


As I said in the title, this is a work in progress and eventually I want to convert the whole thing to bioactive when funds permit it. I'll update this thread as it changes.

I'm always open to questions/comments/critique. Let me know what you think so far!


Thanks for viewing!!

(@poppydear: I'm supposed to mention you here, but I completely forgot how. Sorry!!!)
 
Last edited:

PoppyDear

New member
Oh my goodness it looks amazing!

Is the substrate pretty stiff with all of the excavator clay? It looks like everything is held together pretty well. Very naturalistic and beautiful substrate! I did notice it was pretty deep, where is your heatmat located? For 40 gallon tanks I think heat cables work the best to cover a third to half the tank whereas heat mats are usually not large enough. I can provide more info on heat cables if you'd like!

Good on you for getting the thermostats! The analog might as well be trash, I wouldn't rely on them for anything, mine came attatched to my second hand tank and hasn't moved for almost a year now!

What kind of bulb do you have, is it an "infrared" bulb? I think standard incandescent bulbs with thermostats will do just as well for a photoperiod and heat if that is what you wish to provide. Any bulbs in general should have a thermostat to maintain temperatures.

For plants, if you get to that, I would reccomend some airplants! Easy to care for and a ton of things you can do with them since they don't have roots. The only drawback is removing them from the tank to soak them but they are pretty hardy and can live on ledges, or atop hides, etc. Other grassy plants and even a few succulents would really bring this build alive! It already looks great without plants though!
 

Zux

New member
It looks really good, thanks for such an in-depth post also.

The layout is very well done indeed, great use of various levels of elevation and hardscaping, many people struggle with visualizing that and putting into practice

My only suggestion would be to replace the 'red' tinted bulb with a pure white light emitting incandescent or halogen flood lamp, or even a CHE if you wanted to provide a photo-period by other means.

The red light, contrary to popular belief, is both visible and likely disturbing to the Geckos color perception (this is deeply important to how they perceive their environment) and so they would be a lot better off without that.

I use Ceramic Heat Emmiters (no visible light, just infra-red heat) and UVB personally, but any solution you choose will work as-long as the light it gives off is in the 'daylight' spectrum.
 

Adamk3691

New member
Fair warning: This might be a long one, so strap in :)

Ok! So first of all, I'm somewhat new to keeping leo's, so please keep that in mind when I ask stupid questions/don't know things lmao

I've been working on a vivarium for my two adult female leo's and I'm at a point now where I'm happy enough with it to share some pics.

First of all, some details on the tank itself:

-The viv itself is an exo terra large low, I believe. I bought it from someone on facebook so I'm not completely sure. It's about 40 gallons, has a screen top, swing out doors, etc

-I'm currently using a heating mat on the bottom of the viv and a heating lamp. The lamp is there only because I was unable to get it as warm as I need with the mat alone and comes off at night. (it's also the only light that the viv receives, as one of my leos is an albino morph and I'm worried about her eyesight. The light in my room was off in the pic but it's usually pretty dark since I'm away for work most of the day)

-I've got a thermostat and heat gun coming in the mail, for now I've been keeping an eye on the temps with a stick on thermometer until they arrive

-The substrate is primarily a sand/excavator clay/eco earth mix (about 80% excavator clay, 10% non-calcium "desert" sand, and 10% eco earth) with a sort of "pool" that I carved out in the front that's filled with loose, dry eco earth. The "pool" is to allow for burrowing but so far they seem uninterested in it. I also have peat moss as a substrate in a few of the hides. There's also a part up at the top where it's basically a pit of lava rocks. I'm trying to vary my substrate a lot to give them as much enrichment as possible!

-There are 7 hides in total. Two are humid hides on the warm side, the rest are scattered around so that they have plenty of hides of varying temps to choose from. So far, the most popular have been the two moist hides and the big cool hide on the far right.

-The hides on the warm side have been carved out so that the floor is the glass bottom of the viv and allows for belly heat, with thin layers of eco earth, clay, and peat moss so that they're not in direct contact with the warm glass.


The inhabitants:
View attachment 42271
Miso
View attachment 42273
Taro!

(If anyone knows anything about what morphs these guys could be, let me know!)


I uploaded a short video tour of it on a throwaway tumblr here: https://shitposterextrordinaire.tumblr.com/post/163263377067/vid-tour-1

and here's a clip of the girls when I first put them in: https://shitposterextrordinaire.tumblr.com/post/163263391528/vid-tour-2


And finally: Pictures!
View attachment 42263
The supply pile
-Two 10lb bags of zoo med's excavator clay
-One 2g jug of desert sand (came with the leos, no idea the brand, all i know is that its not calcium)
-one big bag of pre made eco earth (pre made bc it's less humid than making up a fresh batch)
-one pack of peat moss
-one HUGE bag of lava rocks (it was too cheap to pass up at $3, i barely used any)
-bucket full of big bricks (used to build a sort of skeleton that was then covered in the slay)
-various pvc piping for caves/tunnels
-bag of flat rocks
-a couple of pieces of wood from a local pet store
-a couple of pre made hides; one is a sort of rock thing that is split in half, where one half is on the inside of the viv and has a hole so that the geckos can get in, and the other goes on the outside and is attached with magnets that can be removed for viewing, one is a half log, ones a clay pot, and one is a plastic fake piece of rock
-one real tiny cactus (not prickly, dont worry) as a trial to see if it even grows and one fake one for decor
-and ofc, food and water dishes
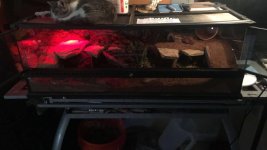
View attachment 42264
View attachment 42265
When I finished the first part, and then later when I added rocks.

Side note: It's weirdly hard to get pictures of this build with that plastic part in the middle lmao
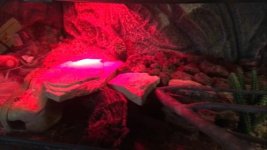
View attachment 42266View attachment 42267View attachment 42268

When I get a chance I'll get side views of the hides on either side since you can see into them and some closeups. You can also see a few differences in the pictures as I added/removed stuff and these were taken over the course of a few days.
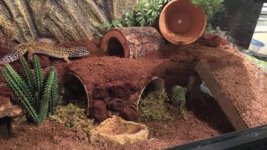
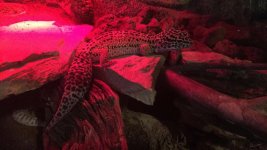
View attachment 42269View attachment 42270

Here's Taro exploring! Miso's a bit shy still, so she's harder to get pictures of.


As I said in the title, this is a work in progress and eventually I want to convert the whole thing to bioactive when funds permit it. I'll update this thread as it changes.

I'm always open to questions/comments/critique. Let me know what you think so far!


Thanks for viewing!!

(@poppydear: I'm supposed to mention you here, but I completely forgot how. Sorry!!!)

Dude, epic build, mine looks like garbage compared to yours holy cow
 

yaoiphobic

New member
Oh my goodness it looks amazing!

Is the substrate pretty stiff with all of the excavator clay? It looks like everything is held together pretty well. Very naturalistic and beautiful substrate! I did notice it was pretty deep, where is your heatmat located? For 40 gallon tanks I think heat cables work the best to cover a third to half the tank whereas heat mats are usually not large enough. I can provide more info on heat cables if you'd like!

Good on you for getting the thermostats! The analog might as well be trash, I wouldn't rely on them for anything, mine came attatched to my second hand tank and hasn't moved for almost a year now!

What kind of bulb do you have, is it an "infrared" bulb? I think standard incandescent bulbs with thermostats will do just as well for a photoperiod and heat if that is what you wish to provide. Any bulbs in general should have a thermostat to maintain temperatures.

For plants, if you get to that, I would reccomend some airplants! Easy to care for and a ton of things you can do with them since they don't have roots. The only drawback is removing them from the tank to soak them but they are pretty hardy and can live on ledges, or atop hides, etc. Other grassy plants and even a few succulents would really bring this build alive! It already looks great without plants though!

Thank you!

Yeah it definetely is stiff. Some parts are still a little moist but the parts that have dried out are near rock solid. If I were to disassemble it, I would probably be able to get most of it out in solid chunks. I was worried about diluting the clay too much but luckily I got the ratios right.

I would love more info on heat cables! My UTH covers a little less and 1/3rd of the viv on the left hand side and it's not as warm as I would like tbh. The substrate IS pretty thick on the right side, but the left side is actually mostly a layer of loose eco earth that goes down to the glass bottom of the tank. Basically, they can burrow for belly heat there. Also, the hides on the left side have been carved out to the bottom and have very thin layers of substrate so allow that heat to come through. Taro likes the rock directly under the red light for belly heat most of the time as it gets warm during the day when the light is on but Miso usually hangs out in one of the carved out hides.

The light is a 75w infared bulb. I got it with the viv and the leos and they were apparently raised under it. I didn't know that about incandescent bulbs though, and seeing Zux's comment below about the red light, I think I might just switch over to that route. I do still want to keep some sort of light on during the day to simulate a natural photoperiod.

Airplants are most likely what I'll be going with considering I kill anything thats not a marimo moss ball (which seem to thrive and grow like crazy under my care for whatever reason?) although right now I've got a tiny little cactus in there just as a trial to see how it goes. My friend "breeds" succulents and gave me a bunch for helping them move so if all goes well I might just add those in as well as airplants. We'll see!
 

yaoiphobic

New member
It looks really good, thanks for such an in-depth post also.

The layout is very well done indeed, great use of various levels of elevation and hardscaping, many people struggle with visualizing that and putting into practice

My only suggestion would be to replace the 'red' tinted bulb with a pure white light emitting incandescent or halogen flood lamp, or even a CHE if you wanted to provide a photo-period by other means.

The red light, contrary to popular belief, is both visible and likely disturbing to the Geckos color perception (this is deeply important to how they perceive their environment) and so they would be a lot better off without that.

I use Ceramic Heat Emmiters (no visible light, just infra-red heat) and UVB personally, but any solution you choose will work as-long as the light it gives off is in the 'daylight' spectrum.


Thank you! I tend to lose track of myself and overshare when it comes to this stuff, I'm glad that it's a good thing in someones eyes haha.

I actually work in the retail field but a huge part of my job is display work as my job is very display oriented with height being something that we work with (locally owned place, each display is like an art piece for us lmao we put a ton of work into the aesthetics of the store) and I think I've picked up a ;ot from that without realizing it. I'm also a visual artist so? I might have an unfair advantage here.

I knew that it was visible but I didn't know that it was possibly stressful :shock:. It came with the viv and the leos, but in all honesty, that might be why my albino doesn't come out as often as I hear they have more sensitive eyes. I was looking into CHE's anyway so your comment just gives me more reason to switch over to them.

Question: If I use UVB, should I still supplement D3? I use it once a week now with calcium but I have calcium without D3. Do I run a risk of over-dosing D3 if I use a UVB bulb?

Again, Thank you!
 

yaoiphobic

New member
Aw thank you! No need to put yourself down, though!! In all honesty, your leo(s) don't care as much about the aesthetics as we do. I'm just extra with my pets :lol:
 

PoppyDear

New member
Hello!

I definately agree with Zux on the lights! If I do a naturalistic viv I will probably copy your substrate mixture. Unrelated but I do love Marimos! I own a few succulents and an airplant, everything else I am not as good with... (I may be killing my bonsai...)

As for cables, this tank resembles yours and I even think it is your exact tank, this just shows how to set them up! :biggrin: You can find all this on Elizabeth's care sheet, post 73!

~~~~~~~~~~~~~~~~~~~~~~~~~~~~~~~~~~~~~
Kyle shares his experience adding heat cable to his leo Gaz's 40 gallon breeder enclosure (36 x 18 x 17 inches). He used 39 feet of heat cables. His instructions and pictures cover it all!

Click: http://www.geckosunlimited.com/comm...eating/79270-repti-heat-cable.html#post450928

•Before with an 11 x 17 inch under tank heat mat:
20150831_220607 (1).jpg

•After with 39 feet of heat cable:
20150831_223625.jpg

The transition from warm side to cool side will be more gradual if the cable is configured like this red "cable" is.

Of course the red cables would be placed closer together and there would be more loops. This is the best a cell phone could do.

16473552_750768792702_6750947765179603186_n.jpg

In a 70*F room the 90*F temperature measured right on top of the substrate beneath the warm dry hide quickly plummets to 70*F (or to the room temperature) say 2 inches away from the mat towards the cool end.

Good luck!
 
Last edited:

yaoiphobic

New member
More pictures w/hide breakdown

I was able to get some better pictures today, so I'm going to dump them here :yahoo:

top view.jpgfull viw 1.jpghides shot.jpg

First, here's a better full view and a top view that allows you to see the rock pit at the top and get a better idea of the hides in here. On the far left at the top, you an see a bit of piping coming up out of the clay with moss in it. That's one of the moist hides; that pipe you see is actually a top entrance tunnell into a hollowed out hide that has a tunnel leading out to the bottom floor of the viv. The top part allows me access to the moist hide to spray it down when it dries out without disturbing whoever is inside the hide itself, and the moisture evaporates upwards, so when the peat moss at the top is dry I know that the rest of the hide is dry a well and gives me a good indicator that I should add more water. The third photo uses Miso's tail to indicate where the tunnell leads out on the bottom.

left side view.jpgright side view.jpg

Now you can see the left and right hides that allow you to see into them. Featuring Taro, who wasn't happy about me moving the rock cover thing and waking her up. (although the pictures are kinda shitty but at least you get an idea haha)

detail 1.jpgdetail 2.jpghides shot 2.jpg

A few more closeups of the hides.

bluprint.jpg

Aaaaaand as a bonus, here's my concept scetch for the whole thing. As you can see, I deviated a bit from it but on the off chance that you can read my terrible handwriting, you can see what I was going for lmao.

Thanks for viewing!!
 
Last edited:

Zux

New member
Hi there,

If you use a suitable UVB system, you do risk potentially harmful oversupply of D3 if you were to continue providing a product with synthetic D3 included, yes.

The Geckos will self-regulate as they have need and produce exactly what they need themselves with suitable access to wild levels of UVB.

It is best to use products with no added D3 from that point on, you may supply a little synthetic D3 once a month or so with little risk, though I do not recommend that personally.
 
Last edited:
Top