How to make your own vivarium, with removable floor for easy cleaning

mecoat

New member
The problem – to find a vivarium of maximum size to fit a specific space in a small flat.
The solution – make one!

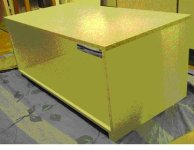
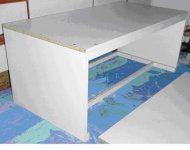
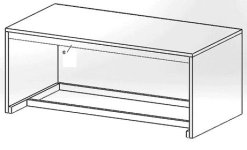
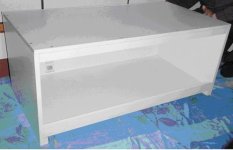
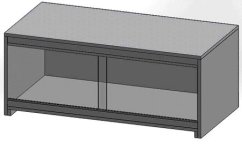
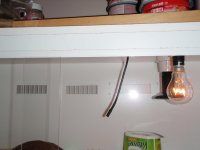
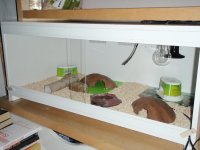
I've popped a picture of our final viv in so you can see what it looks like.

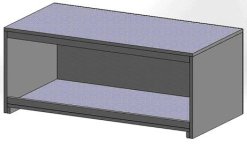
We wanted a viv to fit in a space 935mm wide by 500 deep by 415 high. Contiboard is available in 457mm, so that was the width board we used, and therefore the depth of the viv. Allowing a little space to slide the viv in, and for cables etc, we decided on 910 wide by 400 high.

To make your own you will need:
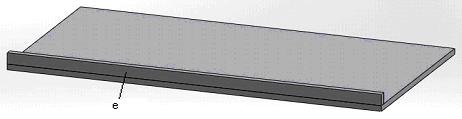
Contiboard– cut to size (how to calculate sizes shown below)
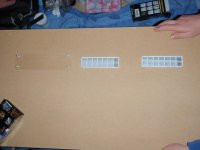
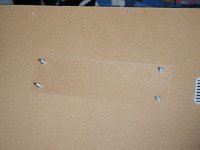
Faced hardboard for the back
Track for the doors
Doors of glass or acrylic (we recommend you measure these when the viv is assembled)
Two small pieces of plywood, or hard wood, as catches
Screws
PVA wood glue
Glue to fit track
Water-based varnish, or iron-on edging strip to seal cut ends of Contiboard
Panel pins
Drill
Screwdriver
Try square
Pin hammer
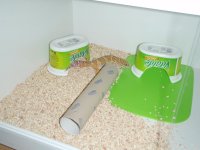
All appropriate heat mats, CHEs/Lights, hides for your gecko and fittings
 

Attachments

  • P2096926.jpg
    P2096926.jpg
    87.1 KB · Views: 320
Last edited:

mecoat

New member
1. Decide on the size of your finished vivarium. These measurements will be called W [910 for us], D [457 for us, width of Contiboard], and H [400 for us]. The other important measurement is the thickness of the board, called T, which is usually 15mm.
2. Cut pieces as follows. It is important that all cuts are exactly at right angles:
a. 1 x top of full width Contiboard = W long [910]
b. 2 x sides of full width Contiboard = (H – T) long [400 – 15 = 385]
c. 1 x floor of full width Contiboard = (W – twice T – 1mm) long [910 – 15 – 15 – 1 = 879] [Note: If you plan to seal the cut ends with iron-on strip, you will need to allow for this when calculating the measurement. The finished floor must be a good fit, see instruction 4 below]
d. 1 x back of faced hardboard = W x H [910 x 400]
e. 3 x struts of Contiboard = (W – twice T) x 30 [880 x 30]
f. 1 x strut of Contiboard = (W – four times T) x 30 [850 x 30]
g. 2 x struts of Contiboard = (D – T) x 30 [457 – 15 = 442 x 30]
 

mecoat

New member
3. Assemble one of strut e, strut f and both of struts g, as shown.

Drill and screw the joints. We made sure the whole viv fitted before we glued the joints, so don’t glue them yet.
 

Attachments

  • making 1.jpg
    making 1.jpg
    11.2 KB · Views: 77
  • making 2.jpg
    making 2.jpg
    18.6 KB · Views: 65

mecoat

New member
Sorry Elizabeth, had to pause for dinner. More instructions now :

4. Fix the sides (part b) onto the ends of this frame.
Make sure the floor (part c) is a tight fit (so mealworms can’t get between the walls and the floor) but the floor can slide in and out – this is why the floor is 1mm shorter. If the fit is not accurate, this is the time to fix it, as you won’t be able to fix it later.
Drill and screw.
 

Attachments

  • making 3.jpg
    making 3.jpg
    10 KB · Views: 43
  • making 4.jpg
    making 4.jpg
    10.4 KB · Views: 34
  • making 5.jpg
    making 5.jpg
    8.6 KB · Views: 35
  • making 6.jpg
    making 6.jpg
    16.1 KB · Views: 39

mecoat

New member
5. Fix the top (part a) onto the sides. Drill and screw.
 

Attachments

  • making 7.jpg
    making 7.jpg
    9.9 KB · Views: 30
  • making 8.jpg
    making 8.jpg
    14.3 KB · Views: 38
  • making 9.jpg
    making 9.jpg
    11.6 KB · Views: 36

mecoat

New member
7. Your two remaining struts (part e) are for the top and bottom of the front opening. Fix one to the underside of the top at the front edge, and the other to the top of the floor at the front edge.
 

Attachments

  • making 11.jpg
    making 11.jpg
    15 KB · Views: 19
  • making 12.jpg
    making 12.jpg
    6.4 KB · Views: 25

mecoat

New member
8. Make any holes you need for vents, electrics etc and fit these now. Be careful if you are putting things at one end (like the heating), check and double check they are going to be at the end you want. We were going to space the vents as though there were 3 (in case I wanted/needed another later), but leave the one at the warm end not cut out. We slipped up and cut that end out, so used some of the offcuts of hardboard to fill it. Just as well we double checked before finally putting the viv together. It would have been much more difficult to fix once put together.
 

Attachments

  • P2090877.jpg
    P2090877.jpg
    92.5 KB · Views: 65
  • P2090875.jpg
    P2090875.jpg
    98.2 KB · Views: 61

mecoat

New member
9. Disassemble the viv and re-assemble it, gluing the joints as you do so.
10. Pin and glue the back onto the case.
 

Attachments

  • making 13.jpg
    making 13.jpg
    14.5 KB · Views: 12
  • making 14.jpg
    making 14.jpg
    13.8 KB · Views: 13

mecoat

New member
11. Drill and screw the two pieces of wood on the front of the case so that they are tight to swivel. These will hold the floor in place when it has been pushed all the way to the back, so that mealworms and crickets can’t creep down the back of the floor.
12. Trim the track to fit and glue in place (make sure the deeper track is at the top).
 

Attachments

  • making 15.jpg
    making 15.jpg
    11.4 KB · Views: 8
  • making 16.jpg
    making 16.jpg
    6.4 KB · Views: 12

mecoat

New member
13. Seal visible cut ends of Contiboard.
14. Slot the doors in by pushing one up into the top track, then letting it drop into the lower track. Repeat for the second door in the other slot. The doors should overlap a little, but not by large amounts (we made a little error, in that we assumed the clear acrylic we are usind was 500mm wide, like the other colours. In fact it was 600mm, causing a quick panicked trimming of the acrylic to length).

Side note : To smooth the edges of acrylic you can use the back of an old bandsaw blade (tape over the teeth to protect your fingers) and run the blade along the edge.
 

Attachments

  • making 17.jpg
    making 17.jpg
    12.3 KB · Views: 11

mecoat

New member
15. Clean all the surfaces, and set up the viv with heat mat, substrate etc. Don't clean the hides your gecko is already using, and use the same substrate he is currently on (transfer it with him). Most of the new viv will then smell like him, so he will feel at home more quickly.
 

Attachments

  • P2096912.jpg
    P2096912.jpg
    91.2 KB · Views: 35
  • P2096923.jpg
    P2096923.jpg
    93.8 KB · Views: 36
Last edited:

mecoat

New member
How I transferred Daff

Having made the new viv, I put in as much as I could (the CHE and light are new, so they went in, along with the cutting boards).

I took Daff out of the old viv, while Mum moved it to make room for the new, then put Daff back in the old viv. The new viv was put into position.
I opened a door on both vivs, the started to transfer the hides. All the hides Daff wasn't using, the water bowl and the meal worm/calcium bowl were all placed at one end of the new viv.

I then started to scoop out the "old" substrate with a Quality Street box, but any similar scoop will do. Scoop it out of the old viv and into the new, laying it flat as you go. When Daff was starting to show interest in the open door on the old viv, I'd already covered about a half of the new viv, so I let Daff walk out onto my hand, and put him in the new viv. He was really excited, sniffing and licking everything in sight.

I quickly peeled off the UTH from the old viv, and attached it to the floor of the new viv. With a wooden viv, the manufacturers recommend putting the UTH inside the viv to prevent overheating as wood is not a good conductor.
I put cable holes at the edge of the floor to get the cables for the UTH and thermostat out, we tried to move the floor enough to get the cables out we struggled (you guessed it, we'd left the doors in). Take the doors out before moving the floor, and move substrate away from the edge.

Daff then decided to come and help us move the subsrate around, digging away at the corn cob pellets I was trying to level out. It was quite funny to watch, a bit like when your toddler goes "Let me help Mummy", you don't want to discouage them, but it's not really helping...

Adjust the layout to suit, and done.

I recommend finishing and placing your new viv on the first day of your weekend. Then you have the second day to check how the temps are going etc. and you aren't worrying about how your gecko is doing in his new viv without you while you're at work.

Pics of adding the sustrate, and Daff "helping"
 

Attachments

  • P2096906.jpg
    P2096906.jpg
    80.1 KB · Views: 35
  • P2096911.jpg
    P2096911.jpg
    92.4 KB · Views: 32
  • P2096923.jpg
    P2096923.jpg
    93.8 KB · Views: 31
  • P2096924.jpg
    P2096924.jpg
    93.6 KB · Views: 18
Last edited:

mecoat

New member
My finished viv

In the first picture you can see the layout I've got. The warm end is to the right and the cool end to the left.

So from left to right in the picture you can see : Cool hide, kitchen roll tube (he likes to play in it), another cool hide and mealworm/calcium dish on a plastic cutting board, water dish, warm moist hide on glass cutting board and warm dry hide. The UTH is under the warm dry hide with a thermostat set to 92F (the 2 cables you can see). You can also just about see the left hand wood block to secure the floor. The wood in the middle of the doors is just being used as a wedge (I don't want Daff escaping, he's a smart boy), and I'm going to replace it with smaller matching pieces.

In the second picture you can see the roof and back layout.

Visible from left to right : 2 vents, the air thermostat controlling the CHE (currently set to about 84F), the vent we cut wrong, 100W CHE, 5-8W light bulb. Both CHE and Light are on a timer, currently 7.30am-7.30pm. I know the light bulb is not on the thermostat, but at such low wattage, it doesn't get hot - I can still touch the bulb if it's on, and I have soft hands.
 

Attachments

  • P2100882.jpg
    P2100882.jpg
    91.1 KB · Views: 34
  • P2100884.jpg
    P2100884.jpg
    86.2 KB · Views: 24
Last edited:

mecoat

New member
I hope this is helpful to people on GU. Please feel free to ask any questions.

I'd like to note that we'd not have been able to make the viv for Daff even 1 month ago. I've learnt so much about leos since I got Daff, despite doing research beforehand.

I'd like to thank my Mum and Dad for helping to make the viv, and all the lovely helpful people on GU for all the helpful threads and info without which my knowledge would have been lacking.
 

mecoat

New member
A couple of things I forgot :
As the vents are in the back of the viv, you can't put the viv straight against a wall. Mine has about 4 inches clearance behind.
To prevent escapes throught the cable holes on the floor, I'm going to plug them with uncooked pastry dough. This should be escape evident in terms of mealworms (crickets are too big to get through with the cables in place), and also if they do eat any, then Daff eats them he's not eating anything too bad, I wouldn't want him eating bluetack for example.
 

mecoat

New member
Extra notes

I was struggling to keep the temperature even vaguely stable with a 100W CHE even on the thermostat. The temperature shot up so quickly with the 100W that the thermostat couldn't cope. I've since replaced with a 25W, which gives a much more stable temperature.

Also, I've moved the thermostat, which required drilling a new hole. I've plugged the old hole with some uncooked flour and water mix to keep the heat in. The temperature is even more stable with the thermostat closer to the CHE.

P3052328.jpg
 

mecoat

New member
A little word of "warning". I leave the door open while I'm feeding the various feeder insects, in case Daff wants to come out and say hello. I usually keep an eye on him so if he does try to climb out I can put my hands there so he climbs onto me. Today I got distracted by the sight of a couple of the mealworm beetles mating (I'm going to try to breed them), and looked up at the viv to see Daff's tail disappearing into the gap underneath the viv. Fortunately he couldn't go to far back because of the supportive cross strut under the floor, but it was a little difficult to get him to come out.

So if you're going to try making this viv, I think there are 3 options:
1. Make sure the cross strut isn't too far back (or put in 2) to stop your gecko getting too far back that you can't get it out
2. Get a really flat surface (eg some of the spare hardboard backing if you've got some)to put onto your surface under the viv (then you can just slide it out with the gecko on to get it out)
3. Don't leave the door open with the gecko unattended

Here are some pics of Daff enjoying his newly discovered "hide".

P3052315.jpgP3052319.jpgP3052326.jpg
 
Top