Revamping food storage containers.

JessJohnson87

New member
As I troll the forums, I see that everyone has made some sort of hide out of food storage containers of many different sizes. So I thought to myself, how can I make it look pretty and appealing for me to look at and have it double as some sort of exercise for my Leo?
20150923_214046.jpg20151009_204350.jpg

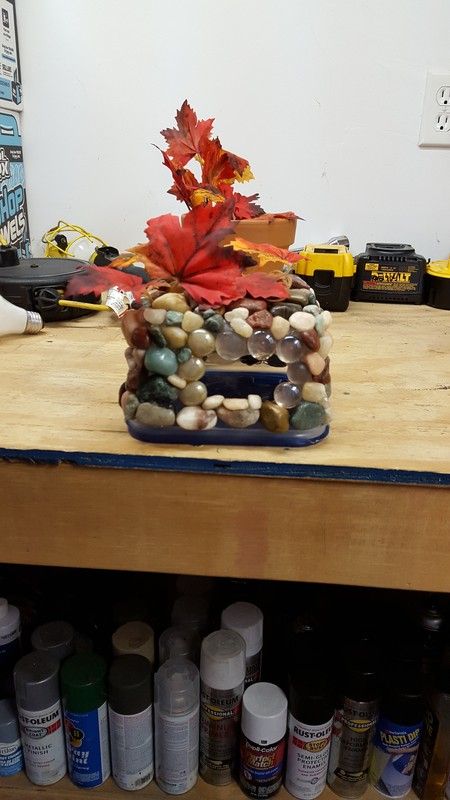
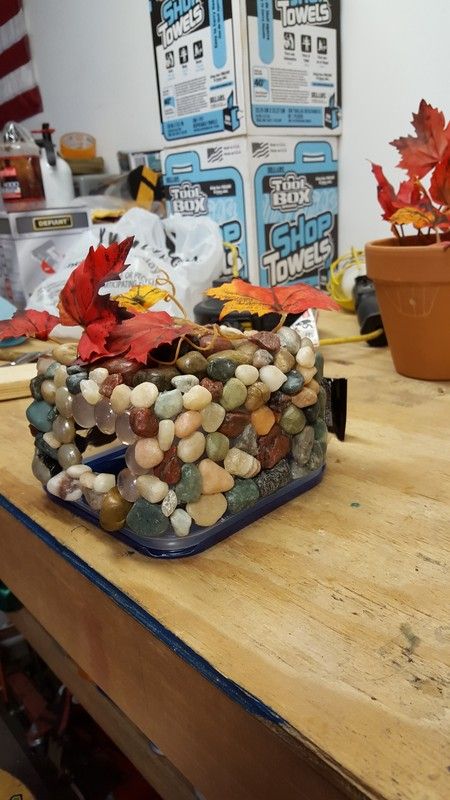
River rocks! Anything can be used really. I will be making a warm moist hide for Ziggy today. I will post pictures of things I use and it will be done slightly different from his cool hide.
 

JessJohnson87

New member
Ok, did all of my shopping, for myself and the gecko.

20151016_114400.jpg

The adhesive I use. Found it at Home Depot where all of the glue and caulking is.
20151016_125152.jpg

All of my supplies. River rocks at Michael's, they were not on sale this time :( but they were $2.99 for a bag and have different stone colors you could use. The container is a medium Ziploc in a 4 pack for $2.50 at the commissary but you can get them anywhere. Sand paper to smooth the rough edges for the hole. Drill or knife to make the hole. Electronic cigarette is completely optional and so is music, but since this is tedious and I get bored, they both help.
20151016_130404.jpg

Used the drill for the hole this time.
20151016_132217.jpg

Started with the bottom edge of the container, since the lip helps hold the stones in place while the adhesive sets, then you can stack the stones on top. But make sure you let the adhesive sit for a few minutes or else they all go tumbling down like Jack and Jill. I will post more later once I start stacking more stones onto the sides.
 

JessJohnson87

New member
20151016_141806.jpg

20151016_141812.jpg

20151016_141818.jpg

Progress!

And the most important PPE in this project....
20151016_141936.jpg

Gloves! Sorry for the look, I'm tired :yawn:
Taking a break for a little while, the DAP is going to my head.
 

JessJohnson87

New member
You're most certainly welcome. I took my laptop out to the garage with me so I could upload pictures as I made progress. Only took a couple of hours from start to finish.
 

Elizabeth Freer

Well-known member
You're most certainly welcome. I took my laptop out to the garage with me so I could upload pictures as I made progress. Only took a couple of hours from start to finish.

/\ Nothing like "hot off the press"! :biggrin:

Just so you know I added a link to this thread to post #114. This thread may get buried after a while, but it will be easy to find in that leo care sheet.
 
Last edited:

JessJohnson87

New member
Brilliant! In total for this project I spent like $9. The first one I made, I spent about the same because I already had a container so I just needed the rocks, DAP and leaves. Was going to put a day of the dead skull on the other one but I wasn't sure about paint fumes so I put it on a shelf in my dining room. I saw the links for the other thread in your care sheet, hopefully people will be inspired :banana:

Forgot to add this tid bit of information. On the tube of DAP, it recommends 24-48 hours to let it cure and for the fumes dissipate.
 
Last edited:

JessJohnson87

New member
Nope! I didn't factor in the cost of the diesel fuel I spent driving to the commissary and Michaels. Here it's only 2.15 a gallon so maybe I spent $11-12 lol.
 

Gixxer450

New member
Lol really like how you showed use on how you made it and by looking at the pic's your Leo really like's it :)!! Nice dewalt drills in the background:cool:
 

JessJohnson87

New member
lol thank you. They're the husbands but he's not here to use them. We also have a really nice drill press, didn't think about using that to make the hole. I've noticed with most DIY threads, visuals and detail are key, I even threw in the picture of the adhesive I used because if you don't know what your looking for, you will over look it. I hope he likes the one I made today, we will find out on Sunday when its completely cured and fume free.
 
Top