1st DIY Leopard Gecko Tank

Featherheart

New member
Well I started building my first leopard gecko tank, using a 20 gallon tank (30"x12"x12") exoterra.
I figured I'd post a list of what items I have and will be using. And then go into detail about what I've done as I go. :D
-3/4" styrofoam
-aquarium glue
-toothpicks (they work great!)
-unsanded grout
-acrylic paint(non-toxic)
-sealant(can't remember the brand name right now...:scratchhead: )

I will also be using some extra loved hides from my current tank, water bowl, and some bark and plastic plants.

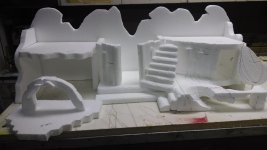
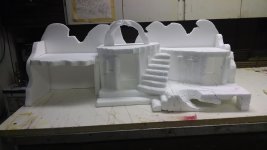
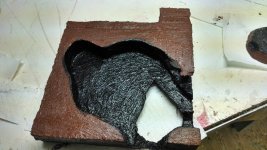
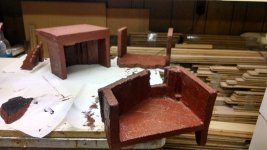
Yesterday I started and finished with the styrofoam buildings. I used the toothpicks to save time and keep the styrofoam together while the glue dried.
I have a picture, but can't upload it right now as I can't seem to find the cord for my camera... But I'll try and get them up tonight for you all.

There are 2 levels to the hide and even an underground area for them to crawl into if they'd like to.
Grouting will hopefully happen tonight or tomorrow, depending on how everything goes.
 

Elizabeth Freer

Well-known member
Ok. I found the cord, let's try this.
View attachment 30274
View attachment 30275

Wish I had your creativity! :)

A couple suggestions:

The stairs to the upper righthand platform seem a bit steep for a leo.

Good with all the hide possibilities! Is it still be possible to reduce the sizes of the openings for both the left "hide" and the right hide above the underground cave? Leos feel safest when the cave/hide openings are not much bigger than they are.

Bare minimum per leo:
warm DRY hide & warm MOIST hide -- both on the warm end of the enclosure
cool DRY hide on the cool end
 
Last edited:

Featherheart

New member
They actually aren't that steep no matter what I did I couldn't make the picture cooperate to the right way for them. I think I might tweek them a bit before I call them done though.
I was thinking that the openings where a bit tall, but wasn't sure. I'll be sure to fix that. Thank you for the second opinion. :D
And they will have a hum hide on the warm side, it's a transfer one from their current home. They love it so I'm gonna keep it with them.:biggrin:
 

Featherheart

New member
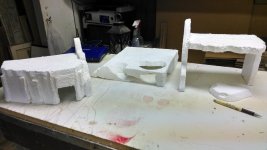
Well I got a little bit of the styrofoam covered, than I ran out of grout. So here's a picture of the few pieces I got done. Just the outside is grouted, not the inside.
I had a little bit of the stuff I have used before ran out and thought I had the right kind... Yeah its not so back to the store tomorrow.
IMG_20140518_234238326_HDR.jpg
 

Featherheart

New member
Well I started painting them today, and I think they look pretty good so far.... Though the color kinda reminds me of chocolate...:drool:
 

Featherheart

New member
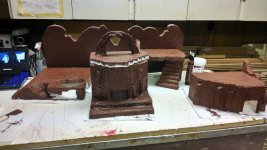
So I got all the pieces painted, I'll be adding some green room the paint for some moss. And then we should be ready to cover in sealent.
Here are the pictures of what I got painted today and once the sealent has completely dried, I'll post a picture of the completed vivarium.
IMG_20140521_112252919_HDR.jpg
IMG_20140521_130335087_HDR.jpg
IMG_20140521_130404981_HDR.jpg
 

Featherheart

New member
Well the sealant has to be put on hold. I can't brush it on because if I use a brush, no matter what I do, I get bubbles. If I could find a spray sealant that was safe I'd be good, but I can't seem to find anything in the forums. Anyone have any idea?
 

mecoat

New member
Not sure it this is of any use, but when varnishing if you want a really good finish a tip I picked up is to dilute the varnish with an appropriate thinner (e.g. white spirit), then rub on with a cloth. Takes much longer to finish, as you do lots of thin layers with the cloth, allowing each to dry before applying the next, but it does give a smooth finish (on varnish and wood). May, or may not, work on your project. (If you do want to try this, I suggest you test it on an offcut first, in case the mix melts the polystyrene).
 

Featherheart

New member
That might work, but my problem is that with how ruff it is and how bad it was bubbling before it might still bubble. I might give it a try though.
 

mecoat

New member
A gentle sand (with very fine sand paper) to smooth things before you try something else?

When you say bubbles - are the bubbles in the sealant, or your product? Polystyrene is a plastic, so will react/melt/dissolve with some chemicals, which might be producing the bubbles.
 
Last edited:

Featherheart

New member
I want it ruff though, I intentionally made it that way. That's the big problem.

It's not dissolving anything, its just that when I start to brush it on the roughness of the material has so many crevasses that the sealant gets stuck and bubble form real easy. I hope that makes sense.
 

mecoat

New member
I think I see. Tried rubbing it on yet? or "stippling" with a brush to smooth it a bit, then "painting" afterwards?
 
Top